
How to Rename Modules and Create Custom Fields in Vryno CRM
Modules
Modules in Vryno let you categorize and keep track of various aspects of your business such as Contacts, Companies, and Deals. The data in these modules are stored as records and the information in each record is stored in fields.
The following Modules are available in Vryno:
- Contacts
- Organizations
- Leads
- Deals
- Activities
- Tasks
- Meetings
- Call Logs
Rename a Module
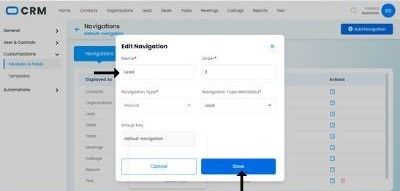
You can rename the modules. Let’s say you refer to deals as opportunities in your org. You can rename the Deals module to “Opportunities”.
- Log in to Vryno with administrator privileges.
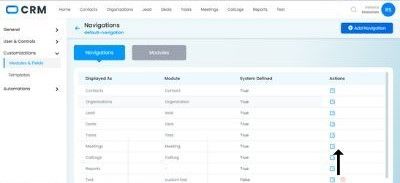
- Go to Settings and then Customizations Module and fields then Navigation then Default navigation
- Click the edit icon next to the Deals module
4. Enter the name you want to give your module in our scenario and its opportunities. 5.Click Save.
Fields
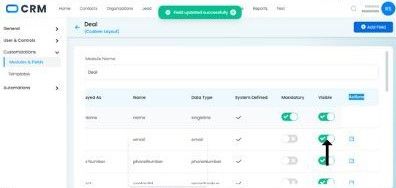
The system-defined fields that are present in every module are called default fields. These fields cannot be renamed or deleted. However, you can move some of these fields to the Unused Fields section of the module if you don’t need them.
To move the System-defined fields to the unused section
1. Go to Settings and then Module & Fields and select the required module.
2. Scroll right and here you can see a checkbox with the name visible.
3. Uncheck that visible button.
Custom Fields
If you require more fields, you can create custom fields for each module.
Types of Custom Fields
The custom fields are classified based on the type of data they hold. Certain field types are classified further into subtypes. The following table displays all the fields and their corresponding subtypes if any.
- Single line
- Number
- Image
- Date
- Date & Name
- True/ False
- Phone number
- Text area
- Text editor
- Search box
- Text dropdown
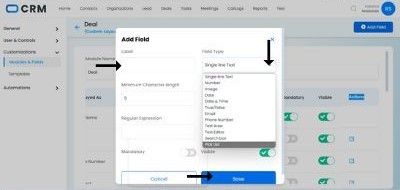
Create custom fields:
1. Log into Vryno with admin privileges.
2. Go to Settings and then Module & Fields and select the required module.
3. Click the +Add field button at the top right corner.
4. Enter the field label and choose the appropriate field type. You can also mark a field as mandatory, Visible, or invisible.
5. Click Save.